Wednesday, May 27, 2020

How to Replace Internal EGR Valve for Volvo L250H Wheel Loader

How to Replace Internal EGR Valve for Volvo L250H Wheel Loader

Chinaobd2 is a leading supplier of all kinds of Car Diagnostic Tool, Truck Diagnostic Tool, OBD2 Code Reader, Car Key Programmer,ECU Chip Tunning,etc. Currently, the top selling product including: VCDS VAG COM Cable, iProg+ Programmer, Scania VCI3

chinaobd2

This is a instruction on how to replace internal EGR valve for Volvo L250H wheel loader.And you can find the more service & repair manual on Volvo PROSIS Parts and service software.

Internal EGR Valve Removing:

1.Place the machine in service position 1, see Service position.

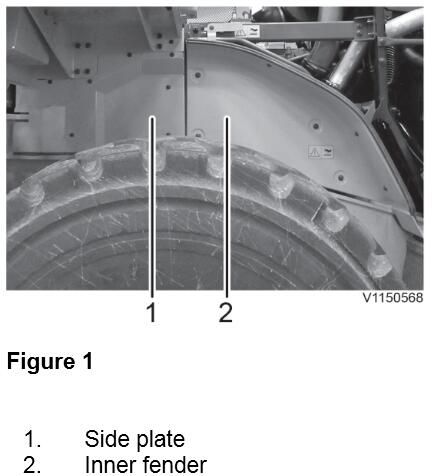
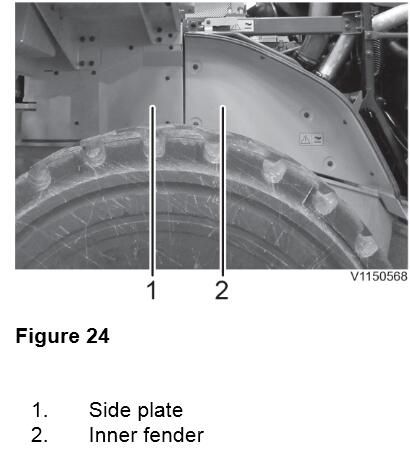
2.Remove the inner fender and side plate on the machine’s left side.

Replace-Internal-EGR-Valve-for-Volvo-L250H-Wheel-Loader-1

3.Remove the flex pipe, see Exhaust pipe flexible tube, replacing.

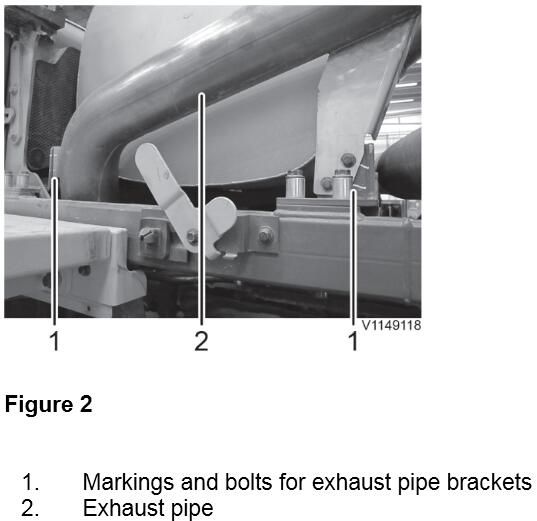
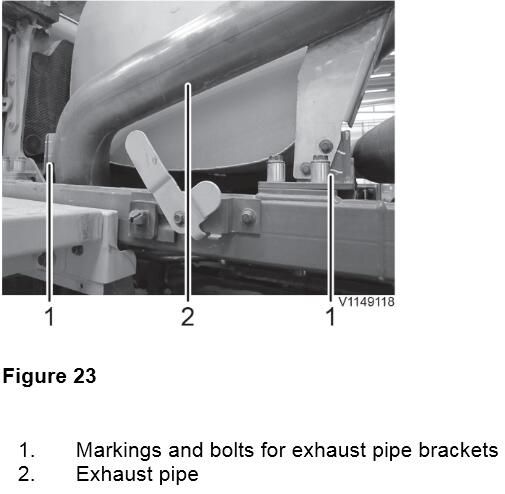
4.Mark the brackets for the exhaust pipe to make reinstallation easier. Remove the V-clamp and the bolts from the bracket for the exhaust pipe (4 pcs.). Remove the exhaust pipe.

Replace-Internal-EGR-Valve-for-Volvo-L250H-Wheel-Loader-2

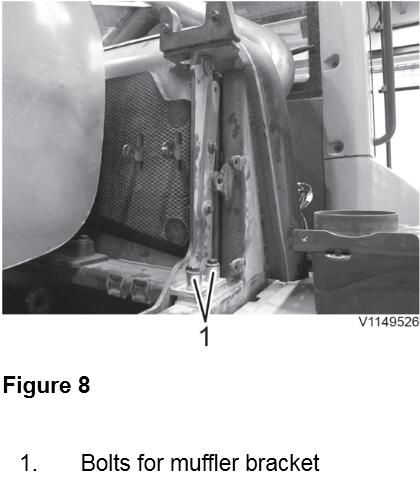
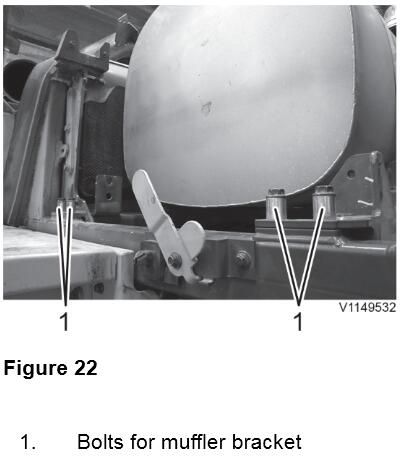
5.Remove the bolts from the muffler bracket (4 pcs.) on the machine’s left side.

Replace-Internal-EGR-Valve-for-Volvo-L250H-Wheel-Loader-3

6.Remove the inner fender on the machine’s right side.

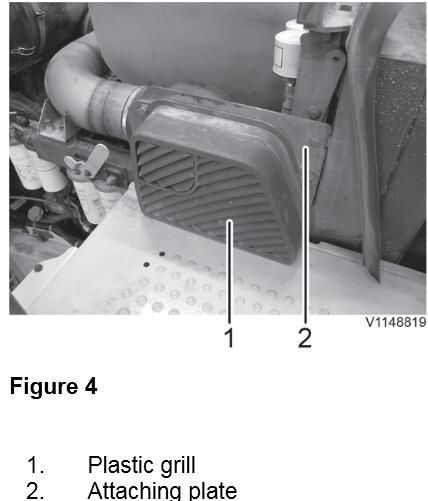
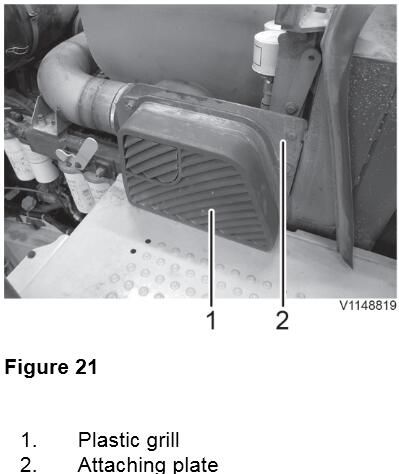
7.Remove the plastic grill and the air inlet’s attaching plate.

Replace-Internal-EGR-Valve-for-Volvo-L250H-Wheel-Loader-4

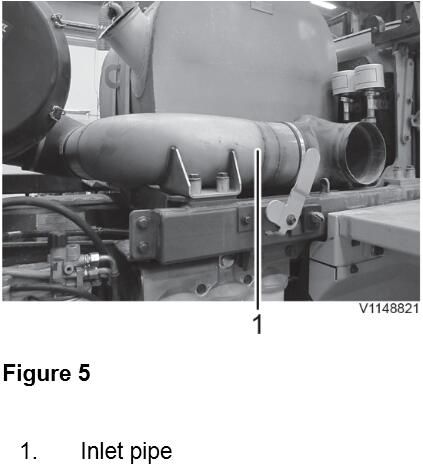
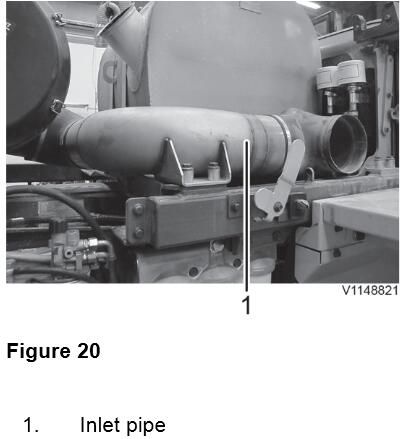
8.Remove the inlet pipe.

Replace-Internal-EGR-Valve-for-Volvo-L250H-Wheel-Loader-5

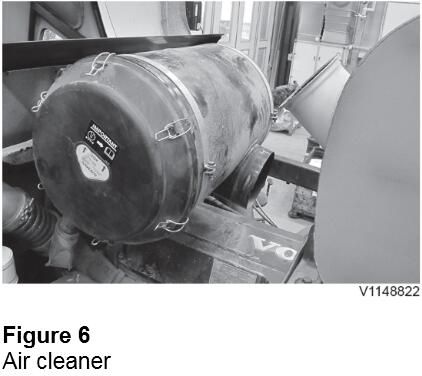
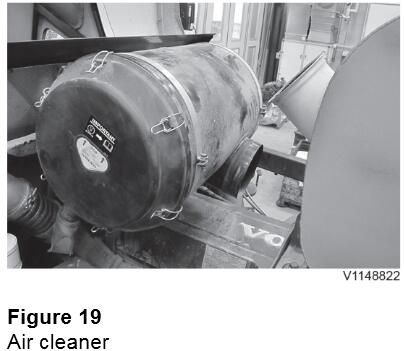
9.Remove the air cleaner.

Replace-Internal-EGR-Valve-for-Volvo-L250H-Wheel-Loader-6

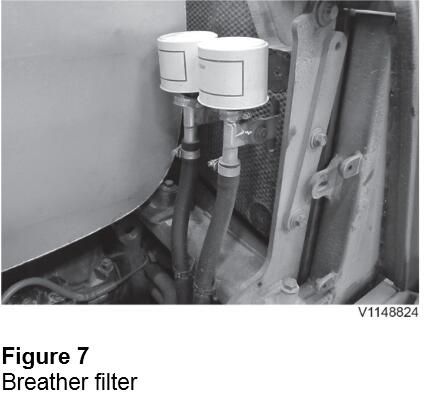
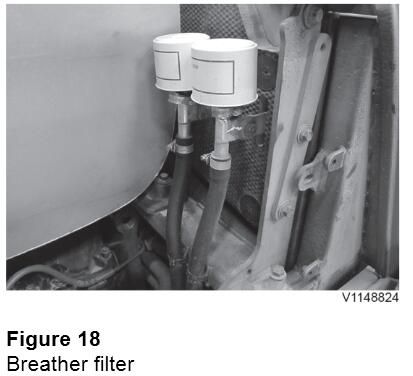
10.Remove the breather filters.

Replace-Internal-EGR-Valve-for-Volvo-L250H-Wheel-Loader-7

11.Remove the bolts from the muffler bracket on the machine’s right side.

Replace-Internal-EGR-Valve-for-Volvo-L250H-Wheel-Loader-8

12.Install a shackle M8 in the bracket’s lifting point and connect a sling 0.5 m to it. Install the ratchet block in the sling and the roof bar.

Replace-Internal-EGR-Valve-for-Volvo-L250H-Wheel-Loader-9

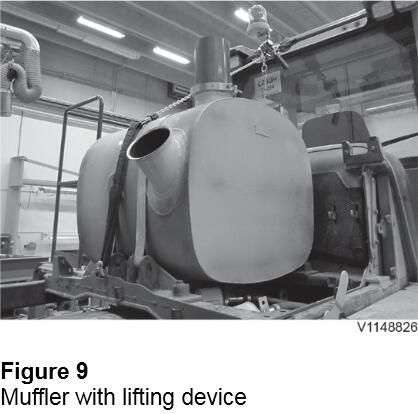
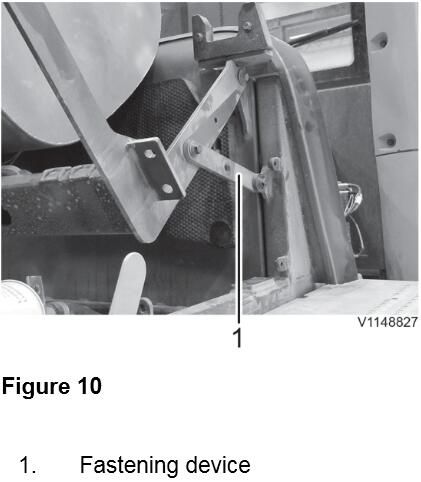
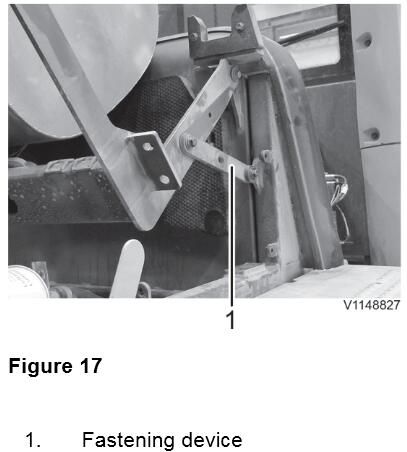
13.Lean the muffler and secure it on both sides with the pre-assembled fastening device.

Replace-Internal-EGR-Valve-for-Volvo-L250H-Wheel-Loader-10

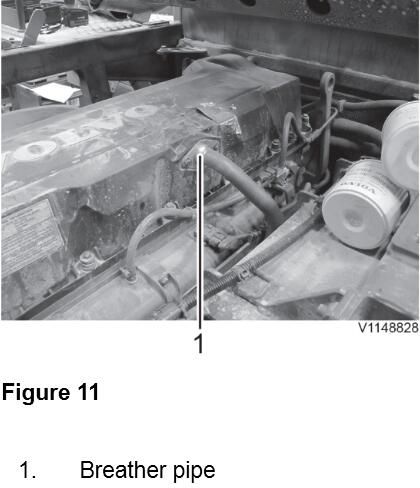
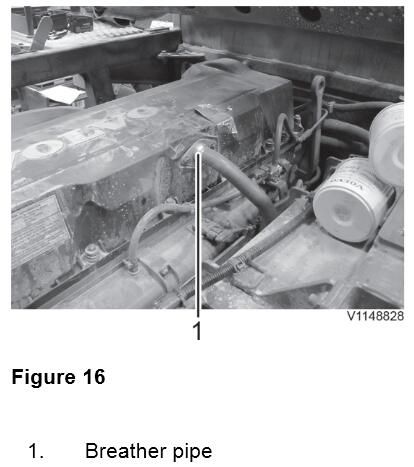
14.Loosen the clamps from the breather pipe and disconnect it from the valve cover. Cut off the cable ties for the hoses.

Replace-Internal-EGR-Valve-for-Volvo-L250H-Wheel-Loader-11

15.Remove the valve cover.

NOTE!

Be careful not to damage the hose nipple for the pierburg valve.

16.Remove the sealing strip from the valve cover.

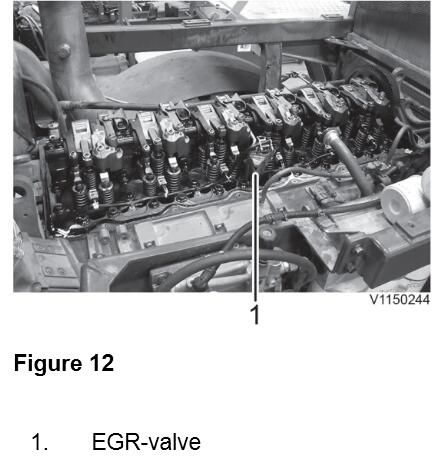
17.Unplug the connector for the EGR-valve and remove the EGR-valve.

Replace-Internal-EGR-Valve-for-Volvo-L250H-Wheel-Loader-12

Internal EGR Valve Installing:

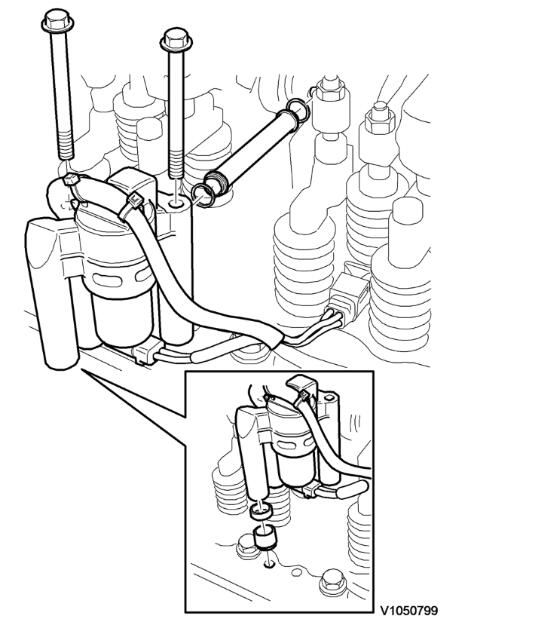
18.Oil in new seal rings and install them on the oil pipe. Push in the end in the rocker arm shaft. Install the new EGR-valve together with the spacer between the valve and the cylinder head. Check that the spacer and seals end up in correct position before tightening the bolts.

Replace-Internal-EGR-Valve-for-Volvo-L250H-Wheel-Loader-13

19.Install a new sealing strip in the valve cover.

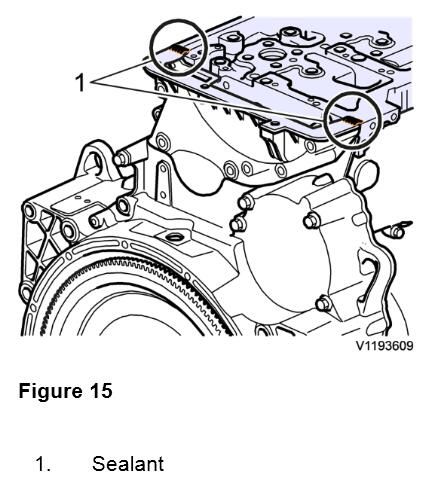
20.Remove the old sealant from the contact surfaces.

Replace-Internal-EGR-Valve-for-Volvo-L250H-Wheel-Loader-14

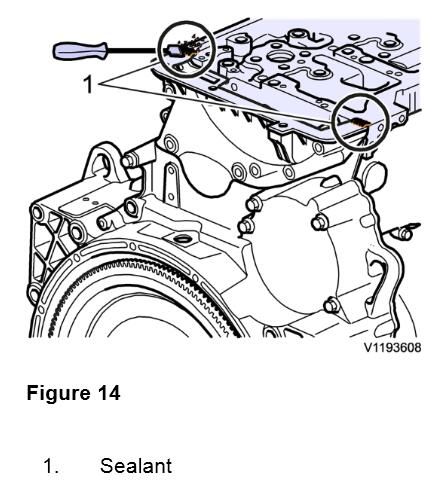
21.Apply two strings of sealant, approx. Ø 2 mm (0.08 in), according to the image.

Replace-Internal-EGR-Valve-for-Volvo-L250H-Wheel-Loader-15

22.Install the valve cover and tighten the bolts.

23.Connect the breather pipe to the valve cover. Install new cable ties for the hoses.

Replace-Internal-EGR-Valve-for-Volvo-L250H-Wheel-Loader-16

24.Loosen the fastening device and restore the muffler to its original position. Remove the lifting device.

Replace-Internal-EGR-Valve-for-Volvo-L250H-Wheel-Loader-17

25.Install the bolts for the muffler bracket by hand on both sides.

26.Install the breather filters.

Replace-Internal-EGR-Valve-for-Volvo-L250H-Wheel-Loader-18

27.Install the air cleaner by hand.

NOTE!

Remember the hose clamps for pipes and hoses.

Replace-Internal-EGR-Valve-for-Volvo-L250H-Wheel-Loader-19

28.Tighten the front bolts for the muffler bracket on the right side.

29.Install the inlet pipe with the rear bolts for the muffler bracket on the right side.

Replace-Internal-EGR-Valve-for-Volvo-L250H-Wheel-Loader-20

30.Tighten the air cleaner and the hose clamps.

31.Install the air inlet’s attaching plate and the plastic grill by hand. Tighten all bolts and clamps.

Replace-Internal-EGR-Valve-for-Volvo-L250H-Wheel-Loader-21

32.Tighten the bolts for the muffler bracket on the left side.

Replace-Internal-EGR-Valve-for-Volvo-L250H-Wheel-Loader-22

33.Install a new gasket and V-clamp on the exhaust pipe. Install the exhaust pipe by hand and adjust according to markings.

Replace-Internal-EGR-Valve-for-Volvo-L250H-Wheel-Loader-23

34.Install the flex pipe

35.Tighten all bolts and clamps for the exhaust pipe.

36.Install the side plate and the inner fenders.

Replace-Internal-EGR-Valve-for-Volvo-L250H-Wheel-Loader-24

37.Restore the machine.

This article tech Supported by China OBD2,

MUT-3 MUT-III Mitsubishi Diagnostic Software Free Download

MUT-3 MUT-III Mitsubishi Diagnostic Software Free Download

Chinaobd2 is a leading supplier of all kinds of Car Diagnostic Tool, Truck Diagnostic Tool, OBD2 Code Reader, Car Key Programmer,ECU Chip Tunning,etc. Currently, the top selling product including: VCDS VAG COM Cable, iProg+ Programmer, Scania VCI3

chinaobd2

Her in this post car-auto-repair.com show you the download source of Mitsubishi diagnostic software.

MUT-3 MUT-III program for Mitsubishi dealerships for diagnosing vehicles. Mitsubishi MUT III program of the last generation , replacing the Mitsubishi MUT II. This is due to the introduction of new technologies in electronics cars Mitsubishi, for example such as CAN bus .

MUT-3 MUT-III Mitsubishi Diagnostic Software Free Download

MUT-III Diagnostic Software Support System:

MPI/GDI/DIESEL

IMMOBILIZER

ELC-AT/CVT

SS4II

TCL/STABILITY CONTROL

AUTO CRUISE

ECS

4WS/Electric Power Steering

ABS/ASC/ASTC

HBB


Requirements:

Win: Windows XP; Windows Vista; Windows 7; Windows 8 (32bit)

CPU: Pentium/Athlon 400 MHz or higher

RAM: 512 MB of system memory

Hard Drive: 2 GB of available space

Original diagnostic adapter (VCI)

DVD-ROM

Mitsubishi MUT-III Free Download

Mitsubishi MUT-III PRE 18031-00

https://mega.nz/file/DfgSDCDY#LbGs-Hb9PmvwqxJq4bwn6uSeOuVJLpU0DWomgqEnXQ8

PRE15061-00

https://nitroflare.com/view/1CA2F5A03DE90C8/PRE15061-00.zip

This article tech Supported by China OBD2,

How to Install Original Isuzu CSS-Net Part Catalog Software

How to Install Original Isuzu CSS-Net Part Catalog Software

Chinaobd2 is a leading supplier of all kinds of Car Diagnostic Tool, Truck Diagnostic Tool, OBD2 Code Reader, Car Key Programmer,ECU Chip Tunning,etc. Currently, the top selling product including: VCDS VAG COM Cable, iProg+ Programmer, Scania VCI3

chinaobd2

This is a step-by-step guide on how to install original Isuzu CSS-Net part catalog software.

Installation Specification for Isuzu CSS-Net

1) Required User Level

-To Install: Administrators

-To Use: Users

2) Required/Suggested PC Specification

-OS :Windows Vista/7/8/8.1(32bit/64bit)/Windows 7(32bit/64bit)

-IE:Internet Explorer 7-11 (32-bit)/Internet Explorer 9(32-bit)

-MEM: 1GB RAM/3GB+

3) In case of blocked connection by virus protection or windows firewall, windows defender, network protection, etc., please enable following programs to communicate without interference from all of above.

Related Contents:

Isuzu G-IDSS Export 2019 Diagnostic Software Free Download

Isuzu E-IDSS Engine Diagnostic Service System Download

Installation Instruction

1) Access download site URL: https://www.css-club.net/isuzu_dl8e/

2) Enter User ID and Password given to login page.

How-to-Install-Original-Isuzu-CSS-Net-Part-Catalog-Software-1

3) Click on the Link Below.

How-to-Install-Original-Isuzu-CSS-Net-Part-Catalog-Software-2

4) Dialog will show, so click on “Save”.

How-to-Install-Original-Isuzu-CSS-Net-Part-Catalog-Software-3

5) Select desktop as the download folder, then click on “Save”.

How-to-Install-Original-Isuzu-CSS-Net-Part-Catalog-Software-4

6) Once download is finished, right click on installer, then select “Properties”.

How-to-Install-Original-Isuzu-CSS-Net-Part-Catalog-Software-5

7) Property screen will show, so click on “Unblock” then press “OK”.

How-to-Install-Original-Isuzu-CSS-Net-Part-Catalog-Software-6

8) Right click again on the downloaded installer, then click on “Run as Administrator”.

How-to-Install-Original-Isuzu-CSS-Net-Part-Catalog-Software-7

9) Click “Yes” to User Account Control message.

How-to-Install-Original-Isuzu-CSS-Net-Part-Catalog-Software-8

10) Welcome screen for Windows Installer will show, please click on “Next”.

How-to-Install-Original-Isuzu-CSS-Net-Part-Catalog-Software-9

11) Please click on “Install” to start Installation.

How-to-Install-Original-Isuzu-CSS-Net-Part-Catalog-Software-10

12) Please wait while files are installed on your PC. This may take couple of minutes.

How-to-Install-Original-Isuzu-CSS-Net-Part-Catalog-Software-11

13) Once the installation finishes, please click on “Finish” to exit the installation.

How-to-Install-Original-Isuzu-CSS-Net-Part-Catalog-Software-12

Setting up the Isuzu CSS-Net

Adding Isuzu CSS-Net to Trusted Site.

1) Open Internet Settings for Internet Explorer.

How-to-Install-Original-Isuzu-CSS-Net-Part-Catalog-Software-13

2) Go to Security tab, choose Trusted Site, and then click on “Sites” button.

How-to-Install-Original-Isuzu-CSS-Net-Part-Catalog-Software-14

3) In the pop-up box, please type http://www.css-club.net then click “Add”.

How-to-Install-Original-Isuzu-CSS-Net-Part-Catalog-Software-15

*** Make sure that the site is added to the Trusted Site.

How-to-Install-Original-Isuzu-CSS-Net-Part-Catalog-Software-16

4) Once the setting is finished, please close all the properties of Internet Settings.

***If in case Internet Explorer is up and running, please close ALL instance of Internet Explorer before using Isuzu CSS-Net.

Using Isuzu CSS-Net for the first time.

1) Double click on the desktop icon.

*** Make sure you always start the application from this icon.

How-to-Install-Original-Isuzu-CSS-Net-Part-Catalog-Software-17

2) Login from the login page of Isuzu CSS-Net. If first time, the ActiveX prompt might show. Please choose “Run Add-on” to enable the control for Isuzu CSS-Net.

How-to-Install-Original-Isuzu-CSS-Net-Part-Catalog-Software-18

3) Prompt will show, so press “Run” to enable it.

How-to-Install-Original-Isuzu-CSS-Net-Part-Catalog-Software-19

III. Setting The Compatibility View.

After logged in, click the icon on IE’s address bar.

How-to-Install-Original-Isuzu-CSS-Net-Part-Catalog-Software-20

*Depending on the IE’s version, the compatibility view setting may be in “Tools.”

All steps needed to use Isuzu CSS-Net is now completed.

This article tech Supported by China OBD2,

ISUZU Truck Control Module Failed Reprogramming Attempt Solution

ISUZU Truck Control Module Failed Reprogramming Attempt Solution

Chinaobd2 is a leading supplier of all kinds of Car Diagnostic Tool, Truck Diagnostic Tool, OBD2 Code Reader, Car Key Programmer,ECU Chip Tunning,etc. Currently, the top selling product including: VCDS VAG COM Cable, iProg+ Programmer, Scania VCI3

chinaobd2

Some customers may experience various warning lights, reduced vehicle speed or a no start condition. Technician diagnosis may reveal one or more CAN communication error related DTCs and at least one control module will not communicate with IDSS. This condition was most likely caused by a failed reprogramming attempt of a control module.More ISUZU trouble please check here:ISUZU Trouble Repair

1

IMPORTANT: DO NOT REPLACE THE CONTROL MODULE.

It is possible to recover a control module after a failed programming attempt. Follow the service procedure below in order to recover a control module after a failed programming attempt or when IDSS cannot communicate with the control module.

SERVICE PROCEDURE

1.Instructions for Control Module Recovery Fully close IDSS.

2.Disconnect the IDSS interface module connector from the vehicle data link connector (DLC) [if connected].

3.Turn OFF the ignition and wait 1 minute.

4.Connect IDSS to the vehicle DLC and the PC USB port (if not already connected).

5.Turn ON the ignition with the engine OFF.

6.Open IDSS.

7.Choose the correct vehicle information on the IDSS Main screen and then click Submit.

8.Click on Controller Programming from the table of contents.

IMPORTANT: The left IDSS bulb on the ICON toolbar MUST be green at this point indicating IDSS is connected to the vehicle AND is talking to the PC USB port. If it is still red, check that the IDSS interface module is being powered up by making sure the IDSS interface module power LED is red. If it is red, then the PC may not be talking with the USB port and a PC reboot may be necessary.

9.If IDSS automatically goes to a VIN screen under Engine Control Module (ECM) Programming > Software and Calibrations > Replace and Reprogram Controller, go to Step 10. Otherwise, go to Step 18.

10.Enter the correct 17-digit VIN at the VIN enter screen, then click Next.

11.A pop-up message will occur stating the VIN has been changed. Confirm the correct VIN was entered, and then click Yes.

12.Do NOT turn OFF the ignition at the Install New Controller screen. Click NO when asked is the Original Controller installed.

13.Click Reprogram Controller at the Summary of Calibrations screen. Programming should begin.

NOTE:The controller is accepting the download IF the programming dialogue Sending Bytes is incrementing. The Sending Bytes incremental counter normally begins at around 20-30 seconds.

14.When instructed to do so after the programming event has finished, turn OFF the ignition and wait for the counter to finish counting down.

15.Turn ON the ignition with the engine OFF, then clear all DTCs.

16.If this is a new ECM, program the Speedometer Calibration, Fuel Injector Flow Rates and any associated Vehicle Options.

17.Go to Step 24.

18.Navigate to the control module to be reprogrammed, and then choose Software and Calibrations > Replace and Reprogram Controller.

19.Enter the correct 17-digit VIN at the VIN enter screen, then click Next.

20.Do NOT turn OFF the ignition at the Install New Controller screen. Click NO when asked is the Original Controller installed.

NOTE:The controller is accepting the download IF the programming dialogue Sending Bytes is incrementing. The Sending Bytes incremental counter normally begins at around 20-30 seconds.

21.Click Reprogram Controller at the Summary of Calibrations screen. Programming should begin.

22.When instructed to do so after the programming event has finished, turn OFF the ignition and wait for the counter to finish counting down.

23.Turn ON the ignition with the engine OFF and clear all DTCs.

24.Programming is complete.

This article tech Supported by China OBD2,