– This instruction is to install VIDA 2014D from an .iso image (or from a folder) on a PC with Windows 10 x86-x64 of all options and versions (as of 03/01/2018). Suitable for Windows 8 all versions and versions.
– In Windows 7, installing in the usual way – running \ Install \ DVD \ Vida_dvdheader \ Main \ setup.exe
– If you have an image without the Russian language (and you need it) – unpack the image with any archiver into a folder (for example, VIDA2014D), download the archive at the end of the post, create a ru-RUfolder in VIDA2014D \ DB , put the downloaded servicerep_ru-RU archive into it . zip , you can start the installation.
– If the PC has 2GB of RAM, the hard disk is 20GB (3GB and 30GB for 2014D) and less, you need to unpack the image and make the appropriate changes to the \ VIDA2014D \ Install \ DVD \ Vida_dvdheader \ Compinfo.ini file , in the Win7MinValue lines = we write 512 , in Win7Recommend = we write 5000000 (or we erase one digit at the end), we save.
– If the PC is failed due to unsuccessful attempts to install different versions of VIDA – you need to prepare for a new installation, clean up the OS (uninstall the VIDA, SQL components, delete the remaining folders, delete the remaining keys in the registry).
Method 1
1 . Training.
You do not need to install anything else, except as specified in this manual. Also, there is no need to disable / stop any of the default components in Windows 10 (protector, firewall, etc.).
a ) Install .NET Framework 3.5 from:
– Control Panel – Programs and Components – Enabling or disabling Windows components
In the Windows Components window , mark the .NET Framework 3.5 , then OK , the .NET Framework 3.5 will load and install, you may need to restart. If it is already installed earlier – go to the next item.
b ) Insert the image into the virtual drive (in Windows 10 it is present by default) by double clicking on VIDA2014D.iso .
Open the image folder in the explorer.
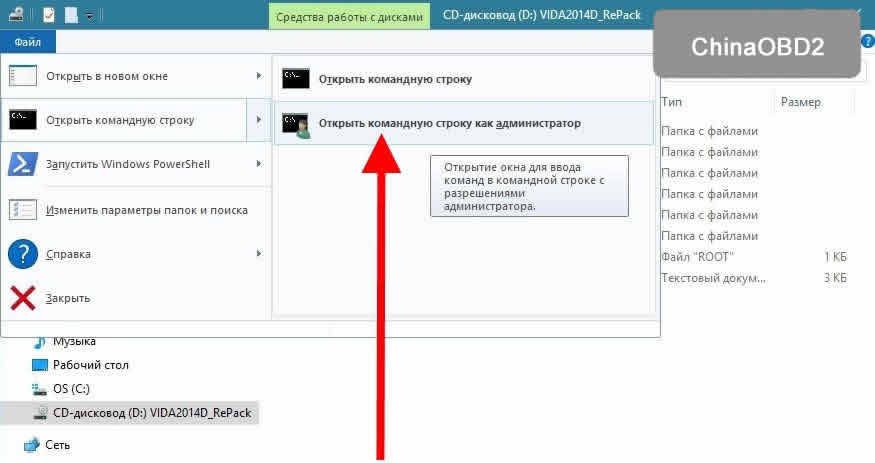
c ) Run cmd from the administrator from the open folder with the image VIDA2014D:
– File – Open Command Prompt – Open Command Prompt as Administrator
Until the end of the installation, DO NOT close the cmd window, we will need it TWO times.
You do not need to install anything else, except as specified in this manual. Also, there is no need to disable / stop any of the default components in Windows 10 (protector, firewall, etc.).
a ) Install .NET Framework 3.5 from:
– Control Panel – Programs and Components – Enabling or disabling Windows components
In the Windows Components window , mark the .NET Framework 3.5 , then OK , the .NET Framework 3.5 will load and install, you may need to restart. If it is already installed earlier – go to the next item.
b ) Insert the image into the virtual drive (in Windows 10 it is present by default) by double clicking on VIDA2014D.iso .
Open the image folder in the explorer.
c ) Run cmd from the administrator from the open folder with the image VIDA2014D:
– File – Open Command Prompt – Open Command Prompt as Administrator
Until the end of the installation, DO NOT close the cmd window, we will need it TWO times.
2 Installation and configuration of Microsoft SQL Server 2008 R2 .
– Copy / paste into the cmd window and press Enter :
– Copy / paste into the cmd window and press Enter :
“3PP” Products / SqlExpress / HIDECONSOLE / ENU / QS
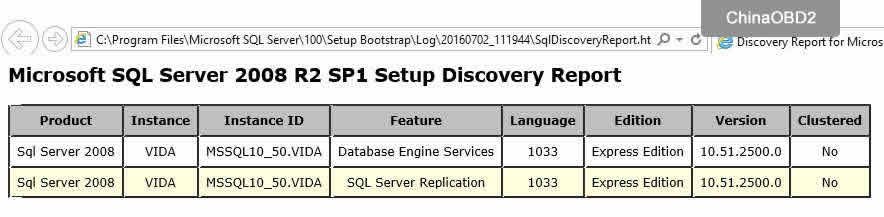
– Wait until the installation is complete. You can check the correctness of the last installation in:
– Start – All Applications – Microsoft SQL Server 2008 R2 – SQL Server Installation Center – Tools – Installed SQL Server features discovery report
The default browser opens with a report. We look – in the table there are two lines (at the end of No it should be so), close the SQL Server Installation Center .
3 Installing VIDA2014D .
– Copy / paste BOTH lines in the cmd window and press Enter :
– Copy / paste BOTH lines in the cmd window and press Enter :
set __compat_layer = WIN7RTM
“Install \ DVD \ Vida_dvdheader \ Main \ setup.exe”
“Install \ DVD \ Vida_dvdheader \ Main \ setup.exe”
– Select VIDA All-in-one .
– Select only ONE language (you can set TWO languages and switch them – see Method 2 ).
– Accept the license agreement.
– Select the installation path. It is recommended to leave the default C: \ VIDA. Time setting takes from 10 minutes (modern PC and SSD) to 40 minutes or more (weak PC and slow HDD). You can monitor it in the Task Manager for the activity of the alba process. At the end of the installation, 4 icons will appear on the desktop.
– Select in the pop-up Internet window, then Save , then Close , and Close again.
– Refuse to reboot.
– Close the cmd window.
4 Treatment and first launch.
– Run New patch (link at the end of the post). After applying the patch (tablet), VIDA Monitor should start, after some time a green arrow instead of a yellow arrow should appear on its icon in the tray.
– In the pop-up window of the regular firewall, select Allow access for Java .
– Launch VIDA with the VIDA All-in-One icon on the desktop (or in the Start menu, or through the right-click menu on the VIDA Monitor icon in the tray).
– If Internet Explorer prompts you to select and enable add-ons – turn it on.
– Enter in the Username : 4 field for the Europe region (others – 1, 2, 3).
– Wait for IsoView to load.
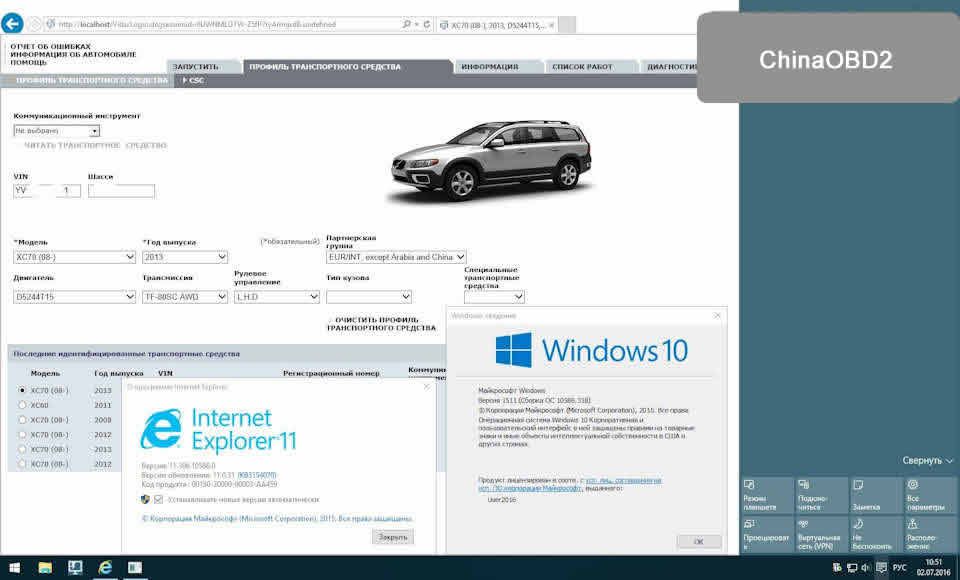
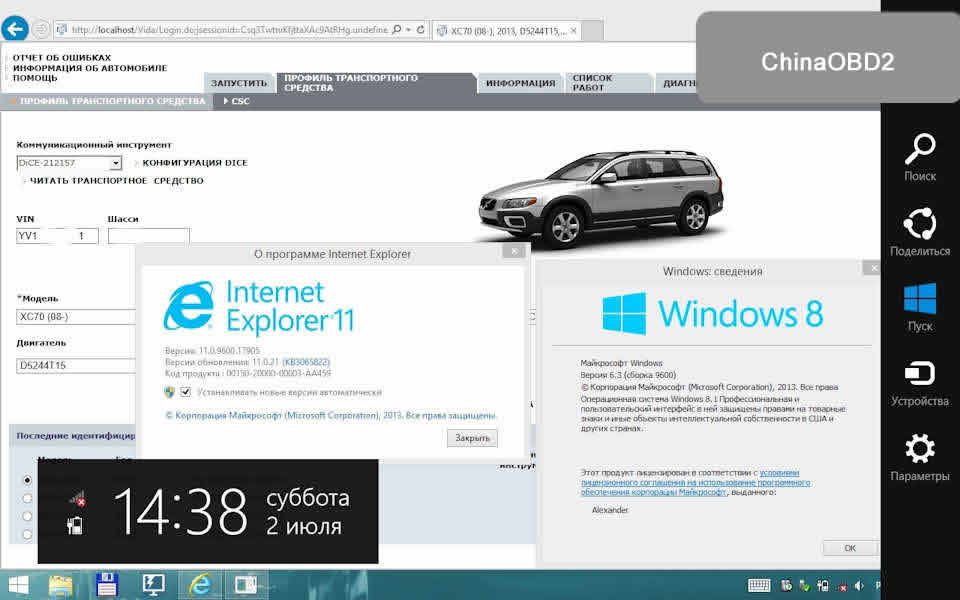
– Go to the Vehicle Profile tab, enter the VIN code. Must open car.
– Disable VIDA eUpdate in the Task Manager on the Startup tab, line Java ™ Platform SE binary . You can also disable VIDA Monitor from startup and launch it as needed from the shortcut in Start – VIDA . Adobe Reader XI , which was installed with VIDA, can be deleted (if you use another pdf application or are not needed). Of the four shortcuts that appeared on the desktop after installing VIDA, only VIDA All-In-One is needed, the other three can be deleted (they are in the Start menu application list).
– Done, you can use.
– Select only ONE language (you can set TWO languages and switch them – see Method 2 ).
– Accept the license agreement.
– Select the installation path. It is recommended to leave the default C: \ VIDA. Time setting takes from 10 minutes (modern PC and SSD) to 40 minutes or more (weak PC and slow HDD). You can monitor it in the Task Manager for the activity of the alba process. At the end of the installation, 4 icons will appear on the desktop.
– Select in the pop-up Internet window, then Save , then Close , and Close again.
– Refuse to reboot.
– Close the cmd window.
4 Treatment and first launch.
– Run New patch (link at the end of the post). After applying the patch (tablet), VIDA Monitor should start, after some time a green arrow instead of a yellow arrow should appear on its icon in the tray.
– In the pop-up window of the regular firewall, select Allow access for Java .
– Launch VIDA with the VIDA All-in-One icon on the desktop (or in the Start menu, or through the right-click menu on the VIDA Monitor icon in the tray).
– If Internet Explorer prompts you to select and enable add-ons – turn it on.
– Enter in the Username : 4 field for the Europe region (others – 1, 2, 3).
– Wait for IsoView to load.
– Go to the Vehicle Profile tab, enter the VIN code. Must open car.
– Disable VIDA eUpdate in the Task Manager on the Startup tab, line Java ™ Platform SE binary . You can also disable VIDA Monitor from startup and launch it as needed from the shortcut in Start – VIDA . Adobe Reader XI , which was installed with VIDA, can be deleted (if you use another pdf application or are not needed). Of the four shortcuts that appeared on the desktop after installing VIDA, only VIDA All-In-One is needed, the other three can be deleted (they are in the Start menu application list).
– Done, you can use.

Image 3: The arrow on the icon should be green.
Method 2 (recommended)
– At the bottom of the post there is a link to the resource where you can download the finished versionwith adaptation to the latest Windows 10 update and the ability to use two languages - Russian and English. It contains an easy way to install using cmd files (you don’t need to enter anything manually). Everything you need to install and normal operation on Windows 10 already exists in the downloaded disk image (.iso).
Solutions to common problems
————————————————– ——————
– VIDA Monitor server does not start … After a while, a red icon appears on the icon ? perhaps another Windows 10 update is to blame. Download the archive with the jdk folder, unload VIDA Monitor, delete the jdk folder from C: \ VIDA , unpack the downloaded one into C: \ VIDA , then reboot the PC. The archive with the necessary, to solve this problem, can be downloaded at the end of the post (my repack already contains this JDK!).
————————————————– ——————
– VIDA Monitor server does not start (JDK is updated or my repack!) … A window appears with a message about the busy 80 m port … It is necessary to determine who occupied the port and release it. Run cmd from admin, type netstat –ao . In the Local Address column, find the line with the 80 m port, looks like 127.0.0.1: 80 . We look at its PID , in cmd we enter cmd tasklist | find “****” (instead of **** – PID). We see the culprit. Or you can do this – launch the Task Manager , go to the Details tab, the required process can be found by the value of the process ID column (the PID that was found in cmd ). Immediately in the Task Manager, you can complete / disable this process (and immediately check the launch of VIDA Monitor).
a) The port is occupied by Skype – in the Skype settings you can change the port (or delete if not needed).
b) Port occupied by IIS service – disable it in the Control Panel – Programs and Features – Enable disabling Windows components .
c) … etc.
————————————————– ——————
– VIDA Monitor server does not start – is there a sign in the icon ? …
a) Unload VIDA Monitor .
b) In the C: \ VIDA \ System \ Log folder, delete all contents except the Diagnostics folder (delete its contents if there is one).
c) Launch VIDA Monitor , wait ?
d) In the folder C: \ VIDA \ System \ Log, look at what the last lines are written in VidaMonitor.log .
d) … depends on what is written there 😎
————————————————– ——————
– VIDA Monitor Server is starting up – a yellow arrow remains on the icon …
a) Unload VIDA Monitor .
b) In the C: \ VIDA \ System \ Log folder, delete all contents except the Diagnostics folder (delete its contents if there is one).
c) Launch VIDA Monitor , wait 5-10 minutes …
d) In the folder C: \ VIDA \ System \ Log, look at what the last lines are written in VidaMonitor.log .
d) … depends on what is written there 😎
————————————————– ——————
– After launching the VIDA All-In-One icon, Internet Explorer opens with a blank page and http: // localhost / Vida in the line …
In Browser properties – Security – Local intranet – Sites – Additionally , add the following node to the zone: paste http: // localhost (remove the space after http), then Add, Close, Ok, Apply . Close Internet Explorer and try again to start VIDA All-In-One .
————————————————– ——————
– Username field is not active … The tablet did not work, apply again carefully observing all the conditions (you can temporarily disable the antivirus), then restart the PC. .
————————————————– ——————
– When entering the VIN-code it writes access denied … Check and enter the VIN-code MANUALLY (NOT through copy / paste).
————————————————– ——————
– After starting, in the field Communication tool – ” cross ” or ” crossed out circle ” … You need to run the reg.files from \ Install \ Utils on the image / disk with VIDA EnableIEHostingx86.reg or EnableIEHostingx64.reg (for x64 OS).
IE should be closed! Archive with the necessary files to solve this problem can be downloaded at the end of the post.
————————————————– ——————
– In the module diagram, no module is selected (not clickable), the site diagrams are very small and nothing is selected …
This often happens on tablets with a screen resolution of 1080P and above (the default scaling is 150%). To work with VIDA, set the Parameters – Display resolution to 720P (1280 * 720) and scaling 100% .
————————————————– ——————
– On the start page of VIDA I enter in the Username : 4 field (and others – 1, 2, 3), the download indicator passes but does not allow to enter further … The old tablet has ended, at the end of the post there is a solution.
————————————————– ——————
Connecting and installing DiCE
If you plan to use DiCE:
– Connect the device to the vehicle’s OBD connector (or power it at 5-12 V / 1-2 A with a suitable power supply, the dice will NOT receive power via USB!).
– Connect it to the USB connector of the PC.
– Wait until the device is installed in Windows.
– Run VIDA, make sure the installed DiCE is in the “Communication tool” field.
Is done.
If you want to use DiCE on bluetooth (you must first connect via USB!), Run (corresponding to the OS bit depth) the reg file and search / add BT devices in the OS. Instructions with the necessary registration files for connecting via Bluetooth and the driver for using DiCE without VIDA can be downloaded at the end of the post.
To test the instrument, use the standard utility of DiCE Diagnostic in – Start – All Applications – DiCE .
Installation of EWD schemes in VIDA
In order for EWD schemes to be accessible from VIDA , you must copy the contents of the Rus folder from the EWD disk (image) to:
\ VIDA \ jboss \ standalone \ deployments \ VidaEar.ear \ VidaWeb.war \ wiring_diagrams \ Rus
If there is no Rus folder on the EWD disk / image, copy the contents from, for example US_Eng , everything is clear in the schemes and in English 😉 You need to copy to the Rus folder, if VIDA is in Russian (if there is no such folder, create one). Then restart VIDA Monitor.
Is done.
Located in Information – Troubleshooting – Wiring Diagrams .
– At the bottom of the post there is a link to the resource where you can download the EWD .
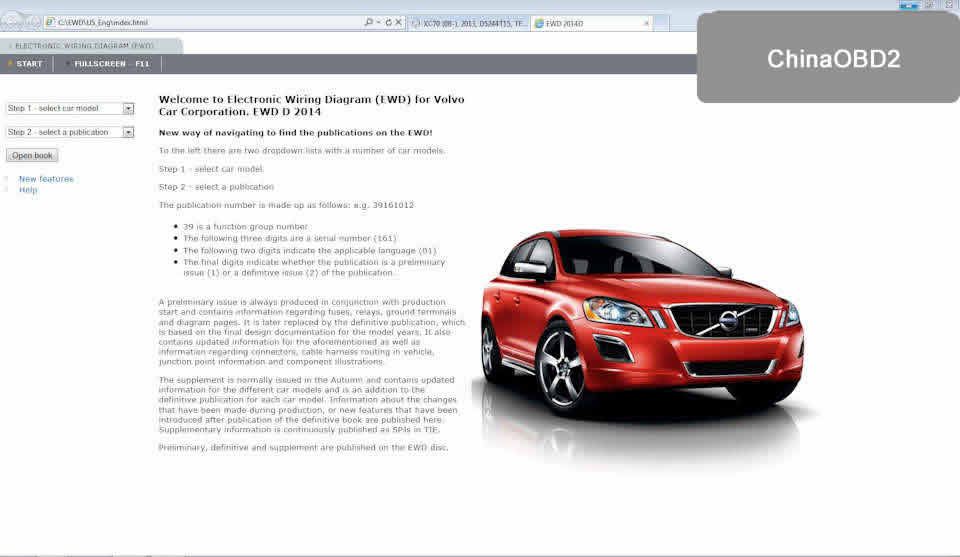
Image 4: EWD 2014D
VIDA access over the network
To make VIDA available over the network, you need to stop VIDA Monitor, change the line in the file:
VIDA \ jboss \ standalone \ configuration \ standalone.xml
<interface name = “public”>
< inet-address value = “$ {jboss.bind.address: 127.0.0.1}” />
</ interface>
on:
<interface name = “public”>
< any-ipv4-address />
</ interface>
Then run VIDA Monitor (or reboot the PC). On another PC, you need to install the accompanying software – IsoView and the driver DiCE (if needed there). From this PC (in the local network, VPN, etc.) in IE, enter the address of the PC from the VIDA – * IP of the computer * / Vida (for example, 192.168.1.25/Vida) or create a shortcut with the object “C: \ Program Files \ Internet Explorer \ iexplore.exe ” * computer IP * / Vida.
Is done.
How to delete profiles of cars that have already been read / entered
Run the file:
\ VIDA \ db \ dbutils \ clearDatabase.bat from the disk / image or from the folder installed by VIDA.
Is done.
ALL profiles and data of read machines will be deleted! Individually delete is not possible. After, you need to reapply the pill .
\ VIDA \ db \ dbutils \ clearDatabase.bat from the disk / image or from the folder installed by VIDA.
Is done.
ALL profiles and data of read machines will be deleted! Individually delete is not possible. After, you need to reapply the pill .
Visual guide for those who first use VIDA and DiCE for diagnostics
If you plan to do the diagnostics yourself, on this site Volvo technical information has a lot of useful information – do not be lazy to read it Thank SergVolvo
The manual page in the Diagnostics section, direct link to
Self-diagnose slide show with DiCE and VIDA .
The manual page in the Diagnostics section, direct link to
Self-diagnose slide show with DiCE and VIDA .
Related Products of Volvo Diagnostic
- Serial Diagnostic Cable For VOLVO Free Shipping
- Best Quality 2014D Vida Dice Diagnostic Tool For Volvo
- OTOCHECKER 2.0 IMMO CLEANER Shipping Online
- VCADS Pro 2.3500 for Volvo Truck Diagnostic Tool with Multi languages
- ORV Renault Opel Volvo 4-in-1 Commander
- XTruck USB Link 125032 Heavy Duty Vehicle Interface Truck Diagnosis Software with All Installers
- Super VCADS Latest Version V2.4.0 For Volvo Truck Diagnostic Tool
- LISHI Series Lock Pick Set 28 in 1 for Different Car
- Mangoose For Volvo Vida Dice Diagnostic Cable
- LISHI S80 NE66 Lock Pick For VOLVO
- LISHI HU56 Lock Pick for Old VOLVO
- KTAG V2.10 ECU Programming Tool Master Version No Checksum Error
- FGTech Galletto 2-Master V50 ECU Programmer Tool With BDM Adaptor and OBD Truck Connector
- 8PIN Cable for VOLVO CDP trucks
- Truck Adblueobd2 Emulator For VOLVO
- Remote Shell For Volvo 4+1 button 10pcs per lot
- Remote Key Shell For Volvo 3 Button 10pcs per lot
- Key Shell For Volvo 10pcs per lot
- HID Xenon Slim Ballast Kit H1 H3 H4 H7 H8 H9 H10 H11 9005 9006 9007
- Original Digimaster III Odometer Correction Master With 980 Tokens
- Smart NE66 2 in 1 Auto Pick and Decoder For Volvo
- Highend Diagnostic Scan Tool OBDII Auto Scanner T79 (Yellow Multilingual Updatable) One Year Warranty
- ADBLUEOBD2 EMULATION MODULE/Truck Adblueobd2 Remove Tool
- NYO Full For Odometer RadioCar Airbag Navigator
- Highen Diagnostic Scan Tool T70 Auto Scanner
- Main Unit Of Carprog Full
- VCADS Pro 2.40 for Volvo Truck Diagnostic Tool With Multi Languages
- New Adblueobd2 Emulation Module/Truck Adblueobd2 Remove Tool 7 in 1 Quality B for Mercedes-Benz, MAN, Scania, Iveco, DAF, Volvo and Renault
- Volvo Service Reset & EPB Electronic Park Brake Tool
- JOBD OBD2 EOBD Color Display Auto Scanner T80 For Japan Cars Wider Vehicle Coverage With CAN Protocol Support
- T75 Professional Auto Code Reader for Volvo
- Super VCADS Hard Disk D630 Format and USB Dongle For Volvo
- AUGOCOM H8 Truck Diagnostic Tool PC-to-Vehicle Interface Easy Portability Increases Flexibility
- Carprog Full V10.93 with 21 Adapter Support Airbag Reset, Dash, IMMO, MCU/ECU
- V2011C WAS Multi-Diag Bluetooth Multi-Languages Truck Diagnosis Free Re-Activation
- Full Set Cables For XTRUCK 125032 USB Link
- FVDI ABRITES Commander For Volvo V4.3 With Best quality And Multifunction Software USB Dongle
- 2014D Super Dice Pro+ Diagnostic Communication Equipment for Volvo With Multi-language
- 2014D Super Dice Pro (Silver Color) Diagnostic Tool for Volvo
- New Key Shell For Volvo 10pcs/lot Free Shipping 10PCS/lot
- Volvo 9Pin to OBDII Cable for DPA5 Scanner
- VOLVO 14Pin Cable for DPA5 Scanner
- VOLVO 8Pin Cable for DPA5 Scanner
- NEXIQ Auto Heavy Duty Truck Scanner tool NEXIQ USB Link + Software Diesel Truck Interface
- NEXIQ USB Link + Software Diesel Truck Diagnose Interface And Software Full Set
- 5PCS/lot Carprog V9.31 Carprog Full
- MPPS V16.1.02 ECU Chip Tuning Scanner For EDC15 EDC16 EDC17 Inkl CHECKSUM Read And Write Memory With Multi Language
- ialtest Link Coder Reader For Paccar Peterbilt Kenworth Freightliner Sterling Westernstar International Mack Renault Hino Trucks
- Truck Adblueobd2 Emulator Quality B for Disabling Adblueobd2 System Of Volvo Heavy-Duties
- AUTOPHIX OM121 OBD2 EOBD CAN Engine Code Reader
- Original Truck Adblueobd2 Emulator 8-in-1 with Nox Sensor for Mercedes MAN Scania Iveco DAF Volvo Renault and Ford
- JLR V145 SDD Mangoose 2013D VIDA for Volvo V9.30.002 TIS Techstream for Toyota 3 In 1 Scanner
- Promotion 8 in 1 Truck Adblueobd2 Emulator with Nox Sensor for Mercedes MAN Scania Iveco DAF Volvo Renault and Ford
- Autophix ES610 Professional Auto OBD2 EOBD Diagnostic Tool For Volvo
- Volvo 88890300 Vocom Interface for Volvo/Renault/UD/Mack Multi-languages Truck Diagnose
- NEXIQ Bluetooth Version VXTRUCKS V8 USB Link Wireless Diagnose Interface with All Adapters(Blue)
- Best Price Adblueobd2 Emulator 7-In-1 With Programming Adapter with Disable Adblueobd2 System for Benz Man Scania Volvo Iveco DAF Renault
- V2.13 FW V6.070 KTAG K-TAG ECU Programming Tool Master Version with Renew Button Unlimited Token
- New Arrival JLR SDD/ TOYOTA/ VOLVO Diagnostic/Programming/Matching Key Multi Function Tool
- Autel MaxiFlash Pro J2534 ECU Programming Tool Works with Maxisys 908/908P
- V2.13 FW V6.070 KTAG Master Version with Unlimited Token Get Free ECM TITANIUM V1.61 with 18475 Driver
- VCADS 88890180 (88890020 + Yellow Protection) V2.01 Truck Diagnostic Interface for Volvo/Renault
- Promotion V2.10 FW V5.001 KTAG K-TAG ECU Programming tool Master Version
- Cheap Ad-blueOBD2 Emulator For VOLVO Trucks
- Truck Adblueobd2 Emulator 8-in-1 With Programming Adapter For Mercedes MAN Scania IVECO DAF Volvo Renault and Ford
- HD208 Heavy Duty Truck Code Reader
- V2.13 FW V7.003 KTM100 KTAG ECU Programming Tool Master Version with Renew Button Unlimited Token
- NEXIQ Bluetooth Version VXTRUCKS V8 USB Link Wireless Diagnose Interface with All Adapters(Red)
- PTT Software 2.03/3.02 For Volvo 88890300 Vocom Interface
- North America Volvo Truck 9Pin Cable For Volvo 88890302 VOCOM
- Linde Lindos 2014 Parts Catalog EPC For Linde ForkLift Trucks
- 88890300 Vocom Interface for Volvo Support WIFI Connection for Volvo/Renault/UD/Mack Truck Diagnose
- PTT Software 2.03.20 for Volvo 88890300 Vocom Interface Preinstalled in 500GB New Sata HDD
- OBD2 Cable For Volvo 88890304 Vocom
- USB Cable For Volvo 88890305 Vocom
- 14Pin Cable For Volvo 9993832 Vocom
- Volvo Vocom 12Pin Cable for Renault Trucks
- 8Pin Cable For Volvo 88890306 Vocom
- Best Quality NEXIQ 125032 USB Link Truck Diagnostic Tool Bluetooth Version
- VBOX-VOLVO XC90 Diagnostic Tool for Volvo Perfectly Replacement For Volvo Vida Dice
- Original OBDSTAR X-200 X200 Pro A+B Configuration for Oil Reset + OBD Software + EPB
- Promotion Carprog Full Perfect Online Version Firmware V8.21 Software V10.93 with All 21 Adapters Including Full Authorization
- Carprog V4.74 With USB Dongle, all Softwares Activated and all Adapters
- XTruck USB Link + 125032 Software Diesel Truck Interface For Heavy Duty Truck
- OBDSTAR X300M Special for Odometer Adjustment and OBDII X300 M Mileage Correction Tool OBD2 Odometer Programmer
- 9 in 1 Ad-blue Emulator for Mercedes/ MAN/ Scania/ Iveco/ DAF/ Volvo/ Renault/ Ford/ Cummins
- NEXIQ 2 USB Link with Software Diesel Truck Interface with All Installers With Bluetooth
- NEXIQ 2 USB Link with Software Diesel Truck Interface with All Installers Without Bluetooth
- Main Unit Of V8.21 Firmware Carprog Full Perfect Version
- NEXIQ Bluetooth Version VXTRUCKS V8 USB Link Wireless Diagnose Interface With All Adapters (Blue)
- XTUNER X500 Bluetooth Special Function Diagnostic Tool works with Android Phone/Pad
- Latest SEC-E9 CNC Automated Key Cutting Machine with Android Tablet
- Original Launch X431 V+ Wifi/Bluetooth Plus HD Heavy Duty Truck Diagnostic Module (2-in-1set)
- Latest V2.23 KTM100 KTAG ECU Programming Tool Master Version Firmware V7.020 with Unlimited Token
- Latest V2.23 KTAG ECU Programming Tool Firmware V7.020 KTAG Master Version with Unlimited Token
- WIFI VXDIAG MULTI Diagnostic Tool for Toyota Honda Land Rover/Jaguar JLR & Volvo 4 IN 1 Scanner
- LISHI NE66 2-in-2 Auto Pick and Decoder For VOLVO
- LISHI 2 in 1 Auto Pick and Decoder Locksmith Kit Including 77pcs
- Latest V2.23 KTAG ECU Programming Tool Firmware V7.020 Master Version with Unlimited Tokens
- VXSCAN H90 J2534 Diesel Truck Diagnose Interface And Software With All Installers Diagnose Engines Transmissions ABS Instrument Panels
- New VXDIAG VCX NANO PRO For GM / FORD / MAZDA / VW / HONDA / VOLVO / TOYOTA / JLR 3 in 1 Auto Diagnostic Tool
- Adblueobd2 Volvo Euro6 Emulator
- KONNWEI KW820 OBDII EOBD Automotive Errors Code Reader Scanner Diagnostic OBD2 Scan Tool Universal Auto OBD 2 Scaner
- 2014D Vida Dice Diagnostic Tool for Volvo
- Yanhua DR-Key DR Key Adapter Work with Digimaster III CKM100 to Unlocking / Reset Key
- Original Foxwell NT201 Universal OBD2 EOBD CAN Scanner Automotive Engine Code Reader Scan Diagnostic Tool Car OBDII OBD 2 Scaner
- Lonsdor K518ISE K518 Key Programmer for All Makes with Odometer Adjustment No Token Limitation Free Update Online
- VXDIAG VCX NANO Pro For GM/FORD/MAZDA/VW/HONDA/VOLVO/TOYOTA/JLR 7-in-1 Auto OBD2 Diagnostic Tool
- New Volvo 88890300 Vocom VCADS Interface PTT 2.03.20 Diagnose for Volvo/Renault/UD/Mack Truck
- XTUNER Bluetooth CVD-6 on Android Commercial Vehicle Diagnostic Adapter XTuner CVD Heavy Duty Scanner
- KONNWEI KW850 OBD2 EOBD Car Fault Code Reader Multi-languages OBD 2 Auto Diagnostic Scanner
- VXDIAG VCX NANO V2014D For Volvo Car Diagnostic Tool Function Better than Volvo Vida Dice
- OBDSTAR X300 DP X-300DP PAD Key Master Tablet Key Programmer Full Configuration
- LAUNCH TS971 TPMS Bluetooth Activation Tool Wireless Car Tire Pressure Sensor Monitoring 433Mhz/315Mhz
- KTMOBD ECU Programmer & Gearbox Power Upgrade Tool Plug and Play via OBD with Dialink J2534 Cable
- Newest FVDI V2018 FLY FVDI ABRITES Commander FVDI Full Version (18 Software) No Time Limitation Covers Functions of FVDI 2014 2015
- Heavy Duty Truck Diagnostic Scanner NEXAS NL102 OBD OBD2 for Volvo Scania Renault Truck Diesel Engine ABS Brake Diagnostic Tool
- TMPro 2 Original TM Pro 2 Transponder Key Programmer Key Copier and PIN Code Calculator Basic Version
- LAUNCH X431 CR3001 OBD 2 CAR Code Reader Support Full OBDII/EOBD Launch Creader 3001 CR3001 Auto Scanner PK AD310 NL100 ELM327
- Volvo Intermediate Storage File Encryptor/Decryptor Visfed Revolation Tea2 Professional 2019 (APCI)
- Latest Version Super Volvo Dice Pro+ 2014D for Volvo Diagnostic
- JLR Mangoose Volvo VIDA Toyota TIS 3-in-1 Scanner
No comments:
Post a Comment